Creating and training new ARToolKit markers
From ARToolworks support library
Main Page > ARToolKit Professional > Creating and training new ARToolKit markers
Contents |
Introduction
What are markers?
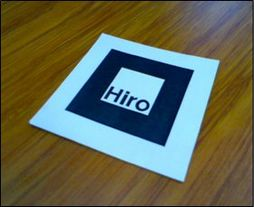
Markers are the squares that ARToolKit recognises and tracks in a video stream. That is, markers are the physical patterns that you've created or printed out. ARToolKit comes with PDF files for some pre-made markers, e.g. the Hiro marker, which you can print out and affix to card or board (so that they stay flat). Markers are the optical inputs to ARToolKit.
Markers have only a few constraints.
- They must be square.
- They must have a continuous border (generally either full black or pure white) and they must sit on a background of contrasting colour (generally the opposite of the border colour). By default, the border thickness is 25% of the length of an edge of the marker.
- The final constraint is that the area inside the border, which we refer to as the marker image, must not be rotationally symmetric (specifically, it must not have rotational symmetry of an even order). The area inside the border can be black and white, or coloured (and ARToolKit provides a means to track with greater accuracy when the marker image is coloured).
ARToolKit Professional v4.x has an additional feature (not found in ARToolKit v2.x), which is to use markers which contain a special two-dimensional grid of black and white squares (a little like a 2D-barcode) in place of the usual marker image. Use of these markers can speed up tracking when there are lots of markers in the scene.
What are pattern files?
Pattern files are files that contain data that represents the image in the center of a marker. When an ARToolKit program launches, it generally loads one or more pattern files so that it knows what markers to look for in the video stream. Pattern files allow ARToolKit to distinguish the markers you wish to track from other square objects in the scene, and to distinguish one marker from another.
You can find the pattern file for the Hiro marker in your ARToolKit distribution, in the file bin/Data/patt.hiro.
If you choose to use ARToolKit Professional v4.x's 2D-barcode markers, you won't need pattern files, just the identifying number of the barcode.
Creating new markers
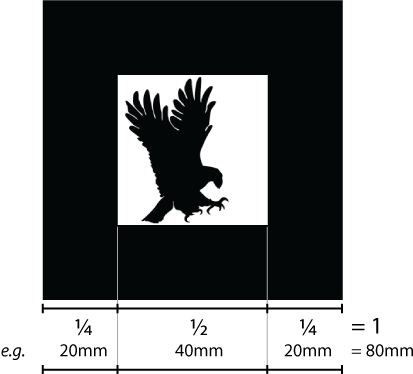
The inner 50% of the marker is interpreted as the marker image by ARToolKit, as per the image at right. Note that the image can be colour, white on black or black on white, and it can extend into the border region. Remember that the part of the image outside the inner 50% will be ignored by ARToolKit though, and also be sure not to extend too far into the border, or else ARToolKit might not recognise the marker at all when its at a very oblique angle to the camera.
Even easier to use is Julian Looser's web-based marker generator. See http://www.roarmot.co.nz/ar/
If you are using 2D-barcode markers, you can find the marker images in your ARToolKit distribution, in the folder doc/patterns/Matrix code 3x3/
Creating the pattern files for your markers (or "training")
Once you have a new marker, you need to let ARToolKit know what it looks like by "training" ARToolKit to the marker's appearance. The output of the training is a pattern file.
You perform the training using the mk_patt utility found in ARToolKit, or you can use an online (Adobe Flash-based) training program.
Training using the mk_patt utility
mk_patt is easy to use. Open a command promp (on Windows, choose "Run" from the Start menu, type "cmd", or on Mac OS X / Linux, open a Terminal window). Run the mk_patt program from the command prompt. Typemk_patt.exeon Windows, or
./mk_patton Mac OS X / Linux. You will see output similar to this in your terminal:
./mk_patt
Enter camera parameter filename(Data/camera_para.dat):
mk_patt wants to know which camera calibration file to use. If you want to use the default calibration file, just press enter. If you've got a calibration file saved elsewhere, enter the path to it instead. At this point, you should see the image from the camera appear.

Point the camera directly at your marker. Try to align the camera so that the marker appears square on the screen, and as large as possible. If ARToolKit has identified the marker, it will outline it with a red/green square.
Rotate the marker so that the red corner of the square is at the top-left corner of your marker, then press the left mouse button. The image will be captured, and in your terminal window you will see the prompt:
Enter filename:
Type a name for your pattern file (usually something ending in ".patt") and press return. If you don't want to save it, just press return to restart the video. That's it! You can train more patterns, or click the right mouse button to exit the program.
If you need to change the default mk_patt settings
The size of the marker border can be adjusted from the command line. Running the utility with the --help option will show the various command-line options for adjusting the default settings. e.g. (Mac OS X/Linux):./mk_patt --helpor (Windows)
mk_patt.exe --help
The help text is reproduced here:
Usage: ./mk_patt [options]
Options:
  --borderSize f: specify the width of the pattern border, as a percentage
             of the marker width. Range (0.0 - 0.5) (not inclusive).
  -border=f: specify the width of the pattern border, as a percentage
             of the marker width. Range (0.0 - 0.5) (not inclusive).
  --cpara <camera parameter file for the camera>
  -cpara=<camera parameter file for the camera>
  --vconf <video parameter for the camera>
  -h -help --help: show this message
Training using the online marker generator
Go to the website http://flash.tarotaro.org/blog/2009/07/12/mgo2/ and follow the instructions.
Using the pattern file
You can change simpleLite or simple applications to use your new pattern by editing the source code and recompiling. First drop your pattern file into the bin/Data directory. Then, in your source code editor, locate the codechar *patt_name = "Data/patt.hiro";and replace "patt.hiro" with the name of your pattern. Recompile, and voila!
Ensuring the best results
- The markers will work best if they're trained on the same camera that is used for the actual application. The camera should be accurately calibrated prior to running mk_patt.
- Don't forget that markers can be colour! Let's see some non-boring markers out there people!!
- A common mistake is to try and use markers with much too-fine detail in the marker image. ARToolKit samples the marker image at only a resolution of 16x16 pixels, so if you're getting markers mistaken for each other, check whether your markers look too similar to each other when the marker image is downsampled to 16x16 pixels.